Cleaning Gourds
Need Gourd Crafting Supplies?
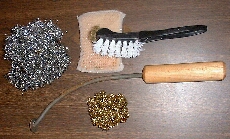
This tutorial will cover everything needed to get a gourd ready for crafting. I am using a bowl for my example here. (Mainly because I am not sure how nice I can get this one cleaned!!!! It has some bad mold and dirt stains.) Everyone uses slightly different techniques when cleaning and this is just mine. It is best if you get as much advice as you can from different sources and then see what works best for you. I can say this......I hear people all the time complaining about how hard gourds are to clean and since I started doing mine this way, I have no problems with even the nastiest ones!!!Here are the tools I use most of the time.
Getting StartedFirst I cut the top out of this gourd using my exacto knife (saw blade). I did this while the gourd was still dirty so I can clean the inside and outside at the same time! You can make the cut freehand or you can place a bowl on top and draw around it with a pencil to create a guide.
After making the cut, lightly sand the opening. This will keep you from scratching up your hands while cleaning the inside and it will also prevent the gourd from cracking while it's drying once it's cleaned.Now scrape out all that you can of the cork like material on the inside of the gourd. This is where the curved scraper in the above picture comes in handy. Be carefull! You don't want any deep gouges on the inside.....It can really ruin the overall look of your finished gourd!
Fill up your tub, sink, bucket (or whatever) with some hot water, a decent amount of bleach,and I like to add a little clotheswashing powder just too loosen up the real stubborn stuff. Submerse the gourd and put an old towel on top to keep the whole gourd under the water. I sometimes leave them in there over night. However, usually a couple of hours will do the trick.
When the gourd has soaked long enough, just lightly brush the outside off with the heavy duty metal scrubber. (Don't rub too hard with it or it will leave gouges that will be difficult to sand away.) Then follow up with a regular scrub pad to get the hard to remove stuff. Be sure to get around the stem and the bottom very well.
Now it's time to clean the inside. Now that it's softened up some, the inside will be much easier to clean. First, gently scrape the walls again to remove most of the white skin. Then, under running water, gently scrape up the sides of the gourd with a wire brush. (like the kind you clean your bar-b-que pit with) Just keep doing this all the way around the inside until the walls are totally clean! Now let your gourd dry
Tip: Before I got my scraper I had made a tool from some old kitchen tongs. I just broke them apart and bent the end a little so that it would reach the curver spots. I'm sure there are also other things you could think of to use!
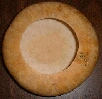
The pictures shown above are what my bowl looks like after cleaning
Once the gourd is completely dry, I brush it inside and out with a coat of Olympic Mildew Check™. I have just recently started using this product on my gourds. It's for cleaning mildew and mold from outside decks and wood and it leaves a residue which keeps them from returning. I find that it significantly decreases the stains and I have had no problem with it drying the gourds or making them brittle, as I thought it might. Here is a pick of the gourd you saw above that has now been treated with mildew check;
I have done many gourds without using this product and haven't had a problem with any of them.
After the gourd is completely dry, Drill holes (if you are putting a rim on the bowl) and sand the inside and outside of your gourd.
You can get a glass like finish if you start with a 220 grit sandpaper and work your way down to a finer grit as you go. Just sand in little circles and sand lightly. Take your time with this step! The final product is well worth it! I had one bowl that took right at 5 hours of sanding. What I ended up with when I applied my final coat of finish after crafting, was a pottery like finish!!!!!!!!
Here's what I ended up with. The first pic is before I polyurethaned or sewed on the rim. The later pic turned out WAY dark!

Contact me by e-mail if you have any questions or suggestions